Last Updated on September 10, 2024 by Tech Queries Team
Switching mouse buttons on a Windows 10 PC is a useful feature that allows users to customize their mouse according to their preferences. This is especially beneficial for left-handed users who may find it more comfortable to reverse the default settings. Whether for personal preference or ergonomic reasons, the ability to switch mouse buttons offers flexibility and can enhance the user experience. Windows 10 provides a built-in option to easily change mouse buttons, making it a simple adjustment for anyone who needs it.
Also, check out Best Ergonomic Mouse for Wrist Pain, which also includes a left handed vertical mouse.
Table of Contents
Benefits of Switching Mouse Buttons
One of the main benefits of switching mouse buttons is that it accommodates left-handed users, who may prefer to have the primary button on the right side. This small adjustment can significantly reduce hand strain and improve comfort during extended use. Additionally, switching mouse buttons can boost productivity by aligning the controls with your dominant hand, allowing for a more natural and efficient workflow.
Another advantage is that it’s easy to reverse the settings at any time. If you ever need to return to the default layout, changing mouse buttons back to the original configuration is just as simple, giving you the freedom to experiment and find what works best for you.
How to Switch Mouse Buttons:
Switching mouse buttons in Windows 10 is a simple process that can be done through the Settings menu or the traditional Control Panel. Let’s explore both methods to help you change your mouse buttons easily.
Method 1: Step-by-Step Guide to Switching Mouse Buttons on Windows 10
- 1. Open the Settings Menu:
- Press the Windows key or click the Start Menu icon, then select the Settings gear icon.
- Alternatively, you can use the shortcut
Windows + Ito open the Settings menu directly.

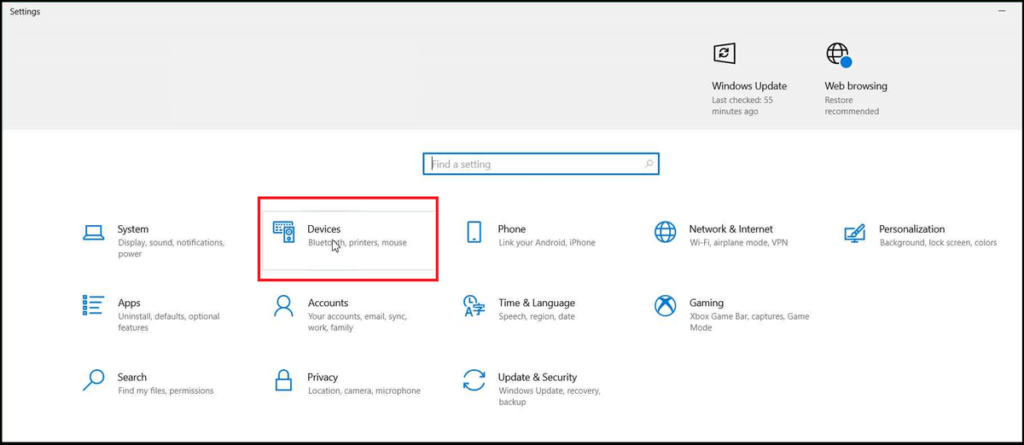
- 2. Navigate to Devices:
- In the Settings window, click on Devices to access various device-related settings such as Bluetooth, Printers, and Mouse.
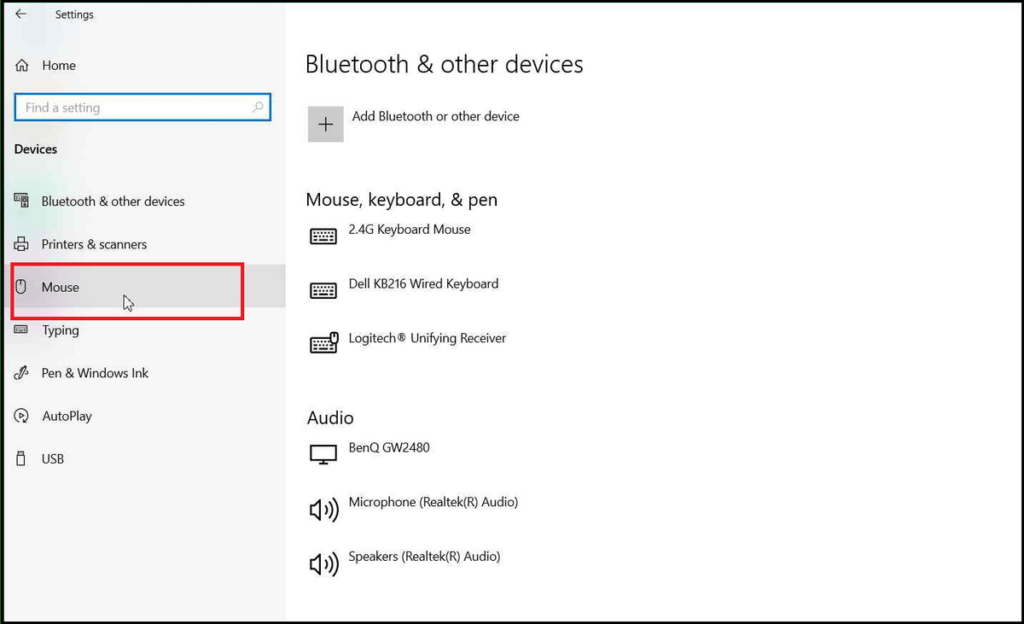
- 3. Select Mouse Settings:
- From the left-hand menu, select Mouse to open the mouse settings panel.
4. Switch Primary and Secondary Buttons:
- Under the Select your primary button option, you’ll find a drop-down menu with the default setting as Left.
- To switch the primary button to the right mouse button, simply select Right from the dropdown menu.
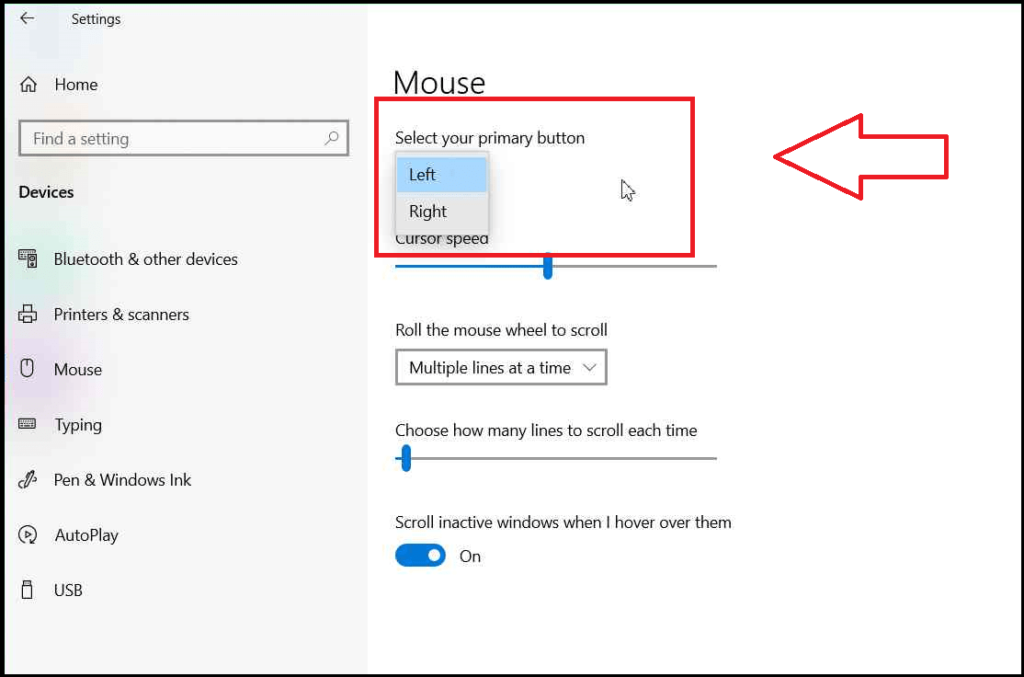
- Now you can perform primary actions like opening a file or folder, selecting objects, and more by using your Right Mouse Button. Accordingly, the Left Mouse Button will act as the Secondary button.
Also, read How to Control Mouse with Keyboard in Windows 10?
- On the same settings page, you will Mouse Wheel settings.
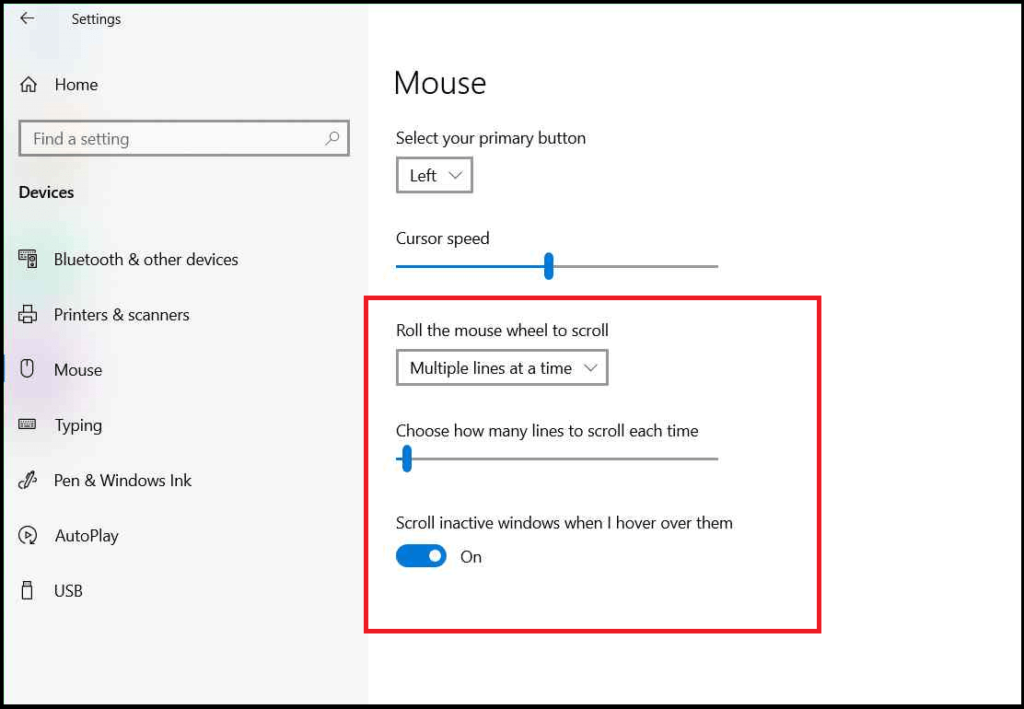
- Moreover, on the right side, you will find the option Additional Mouse Settings.
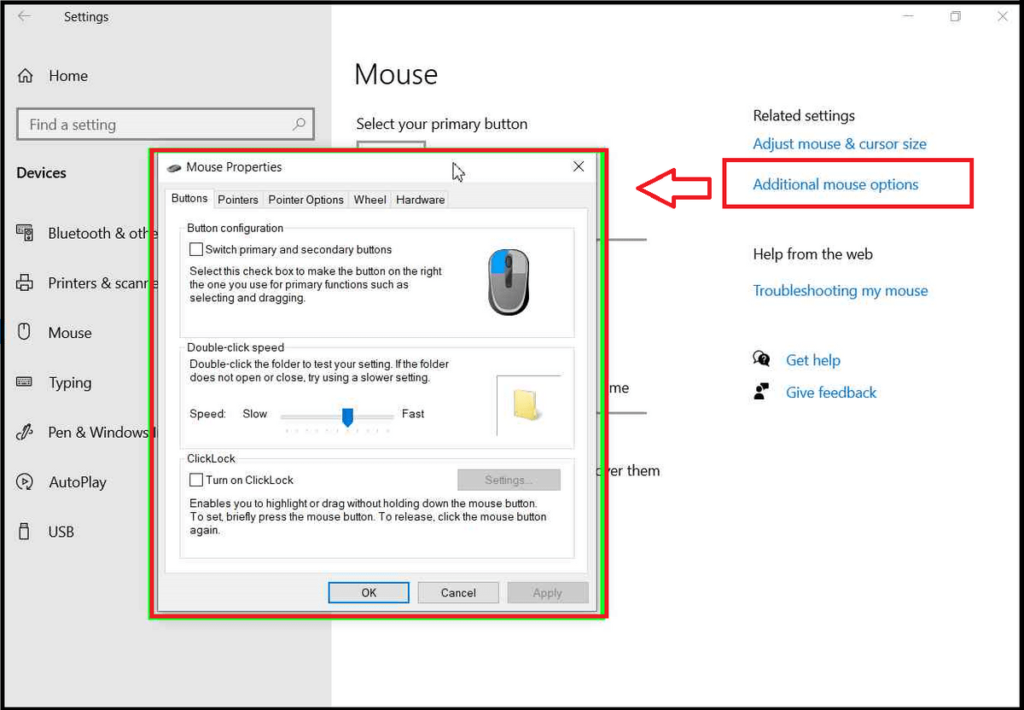
- The Additional Mouse Settings contains options like Double Click Speed, Click Lock, and more.
This is How you can Switch Mouse Buttons for your convenience. Comment below if you have any queries, and share this article on social media, using the icons on the right.
Test Your Mouse:
- After making the change, your right mouse button will now function as the primary button, which is used for selecting items and clicking links. The left button will become the secondary button, used for opening context menus.
- Test the new setup to ensure it works as expected. You can switch back at any time by following the same steps.
Method 2: Shortcut Method Using Control Panel
For users who prefer traditional settings navigation, the Control Panel provides an alternative method to switch mouse buttons in Windows 10. Here’s how you can do it:
- 1. Open Control Panel:
- Press the Windows key and type Control Panel, then select it from the search results.
- 2. Go to Hardware and Sound:
- Once in the Control Panel, click on Hardware and Sound to access device settings.
- 3. Click on Mouse under Devices and Printers:
- Under the Devices and Printers section, select Mouse to open the mouse settings.
- 4. Switch Primary and Secondary Buttons:
- In the Mouse Properties window, under the Buttons tab, you’ll see the option to Switch primary and secondary buttons.
- Check the box next to this option to reverse the buttons.
- 5. Click Apply and OK:
- After making the change, click Apply, then OK to save the settings.
Using this Control Panel method, users can still easily change mouse buttons if they prefer navigating through more traditional Windows settings.
How to Switch Back
If you ever need to revert to the original configuration, switching back is just as simple. You can follow the same steps in either the Settings menu or Control Panel. Since the change is instant, you can quickly adjust your settings based on your personal preference at any time.
Whether you’re using the Settings app or the Control Panel, reversing the switch of mouse buttons takes just a few clicks. This flexibility allows users to experiment with different configurations to see what suits them best without any hassle.
Conclusion
Switching mouse buttons on Windows 10 is a quick and flexible process, offering users the ability to customize their setup with ease. Whether you’re left-handed or simply looking to adjust your mouse for better ergonomics, this feature provides a simple solution. By following the straightforward steps in either the Settings menu or Control Panel, you can easily switch mouse buttons and even revert the changes whenever needed.
If you’re looking for a way to enhance comfort or productivity, don’t hesitate to give this feature a try. It’s an excellent option for those who want to make their computing experience more personalized and efficient. If you are facing any issues, visit Microsoft Support Page.


8 thoughts on “How to Switch Mouse Buttons on Windows 10 PC?”